
In the 2019.1 beta it’s now possible to give a name to each object in the Item Hierarchy. Making use of this new functionality, URL Actions have been improved to allow you to target a specific Web Object on your dashboard that a URL Action should open in, as well as the option to open a URL in an external web browser even if you have a Web Object on your dashboard.
In this post I’ll walk through an example of loading images from different URLs to one of the desired Web Objects on the dashboard or to a separate web browser.
Data source
My simple data source will be the names of four food pictures and their respective URLs:

Sheet Setup
The Product field is on Rows and the URL field is on detail so I can use it in the URL Action on the dashboard later.

Dashboard
The dashboard has the above sheet on the left along with four Web Objects. I’ve added borders to these so they are easier to see.

Rename the Web Objects
The four Web Objects appear in the Item Hierarchy with their default names: “Web” and, in 2019.1, we can now right click on each element and rename it:
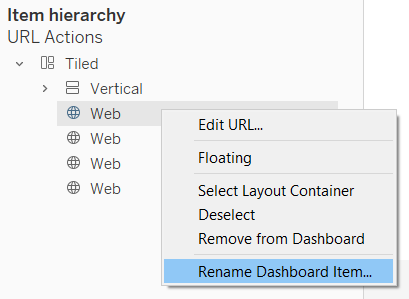
I will give each of these a descriptive name to indicate where each is placed on the dashboard. This will be helpful later when creating the URL Actions:

First go to Dashboard > Actions… to show the Actions dialog, then select Add Action > Go to URL…:

I then created a URL Action with the below settings:

- The name of the Action. This will show in the Tooltip so it should be descriptive as to what will happen when you click the link.
- The URL (which I have on the Detail shelf) is available to add to the URL field. So I am using the URL in my data as opposed to typing one manually.
- When I select the URL field in step 2, it shows in the URL field of the dialog.
- I want the URL to open in a Web Object.
- The new drop down shows me all the Web Objects on the dashboard with the names I gave them earlier on. I select the one that corresponds to the name of this Action.
The above steps were repeated four times to create one action for each web Object. I then created one extra action to open the URL in an external browser window:

All of the actions can be seen in the Actions dialog and this is the order they will appear in the Tooltip:

URL Action Links in the Tooltip
The five URL Actions I created will automatically show in the tooltip, and I’ve added a simple instruction at the top so it’s clear what to do:

And voila! I can now determine where each of the images will load on the dashboard or if I want them to load in a separate browser. The below video shows this in action:
The URLs I’ve been using have all been images, but they could just as easily be links to product pages on a web shop, or different web applications, or any other web page.
Image Sizing
One note on the sizing of the images when they load in the Web Objects. When I first tried loading the images into the Web Objects they didn’t fit exactly. To fix this I added a sizing parameter at the end of the URL. For example adding ?w=300 sets the width of the image to be 300 pixels.
I will add the workbook from this blog to my Tableau Public profile once 2019.1 is released and Tableau Public is upgraded.
Be notified of new content…
If you find these Tableau tips and tutorials useful, you can follow me on LinkedIn for all the latest content.
Thanks,
Marc
The recent release of Tableau 2024.1 includes an update to spatial buffers and you can now create these buffers around line string objects.
Click here to learn more…


Leave a comment